

Pre-backyard Renovation Checklist and The Real Drama in our Marriage

When you’re working with an older house, there are a lot of invisible problems. And when you’re renovating there are a lot of unseen upgrades that have to be taken care of along the way. You might be thinking, what on earth does this have to do with your backyard renovation? Surely exterior work doesn’t affect your house.
Well, remember that huge concrete block:


It has to be removed because it’s making our house sink. And the hammering required to break all that up will create unavoidable movement in the ground, which could compromise our foundation. Hence, why I’ve been dragging my feet on this project. That’s the drama in our marriage right now ha ha! But I’m no longer putting it off. I was waiting for our kitchen to be done, and now I’m finally taking the steps to start our backyard project.
1). Have the foundation under the newer portion of the house (kitchen) reinforced to protect the house when we have the concrete removed.
And while we are down there . . .
2). Add a new radon removal system! It’s time to test our radon levels and since we will be down there changing things about the foundation, it’s a good time to replace the old system. I’d like it to be piped out above our roofline, so that it isn’t coming back in through any of our vents. Radon gas can enter your home anywhere there is cracking in the ground, seams between walls and floors, and where your sump pump is. Speaking of . . .
3). We need to replace our sump pump. I don’t know where the current one is dumping water, but since we are removing the concrete and the gravel side-yard, it’s a good time to re-pipe that out of the house and make sure it’s not causing unseen issues. We have to use our sump pump yearly to clean out our water boiler.
4). Removing the concrete. The big block at the back and the two walkways on either side of the house. We want uniformity in the color and texture, but also the current concrete is showing signs of separation from the wall even after it was patched while our house was being tuckpointed two years ago.


Then for some more exciting upgrades:
5). We need new siding on the back part of the house (JUST the laundry/mudroom section). The current siding situation is a mess. Have you ever seen a house being built when it’s at the phase where it’s just a plywood shell? The siding typically lays down over that along with waterproofing material. Well the “siding” on our house, is just the plywood. There is nothing between it and the interior wall. The most uniform way of dealing with this will be to cap the entire back part of the house in black siding. I’m loving these fluted bricks as a modern spin on traditional brick, especially with the Shou Sugi Ban Siding. I’m looking for vertical shiplap style here. These Concrete Collaborative red breezeway blocks with round cutouts are also my top choice for our privacy wall. At this point in the project we will also need to consider wiring for our exterior lights and TV because we will want to run the conduit behind the siding.
(Psst. . . we are choosing vertical siding because it makes houses look taller and more modern. The thinner the shiplap, the taller looking the house!)

6). We need to add a foundation cover. I don’t know why the foundational cinderblocks are always visible on old houses. Sometimes they’re painted, but ours is just bare. I guess it’s a good thing we can see the cracks? I’d like to add a brick foundation cover, but only if I can find one that will look good next to the brick we already have.
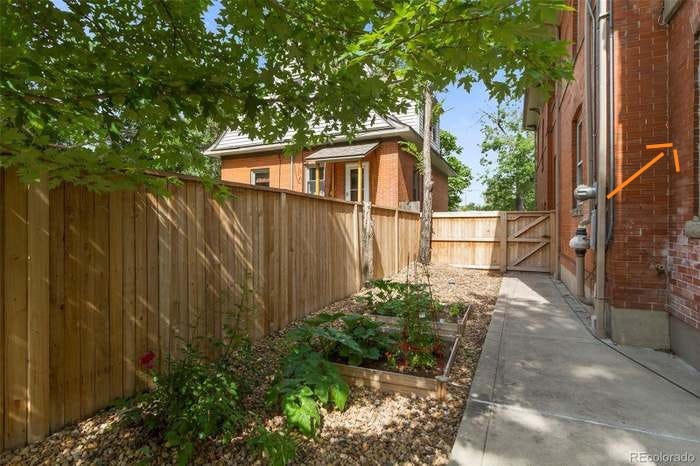
You can see the cinderblock portion of the wall just under the brick in the photo above. This side of the house is where all of the mechanical equipment is. The arrow shows where the black siding will stop. In our final renovation, there will either be a privacy wall, or a privacy alcove blocking the view of this area and the sound from the AC unit. I haven’t deiced which yet.
7). Replacing our French storm drains. After the concrete has been removed it’s the perfect time to repipe our storm drains and make sure the water is collecting in a place where it won’t do any damage.
8). Next we need to think about piping our gas line for our outdoor grill and fireplace. This means that I need to finalize the layout, of which I have a few options still pinging around in my brain!
9). Only then, can we re-pour concrete and move on to actually making our backyard look how we want it to look. And when we do re-pour the concrete there are certain design elements that need to be kept in mind to make sure our project goes as planned. We will need to know exact locations for heavy objects like our bricked-in kitchen, our privacy wall, and our fireplace because of how you have to lay down the concrete to hold weight so that it doesn’t sink. I’m also going to have them gully the concrete where the downspouts are, even though we will have french drains because in the future if there is ever a clog or an issue, then we won’t be compromising our foundation when, say, a big snow storm comes but we don’t know about said clog.
It’s a lot of big, messy, loud steps that I’m dreading, but I’m taking it one step at a time, as my friend Manasi’s children’s book recently reminded me!